How to use WordPress MultiSite feature
by bernt & torsten
Have you heard about the WordPress Multisite feature — WordPress lets a user launch several sites off their main site. It’s not something that most users may know about, but it’s worth getting the details to determine if it’s right for your site.
What is WordPress Multisite?
WordPress Multisite is a special “mode” built into WordPress, which allows you to create a network of multiple websites, all running on a single installation of WordPress. It is a feature that can be turned on or off.
WordPress Multisite is not appropriate for all projects and sites. Here are some examples of when not to use it.
- Client’s Small Business Website: A few informational pages and a contact form? Use WordPress, not WordPress Multisite.
- Portfolio Website: Showcasing your work with images, categories, case studies, and contact info can all be handled within a single WordPress site.
- Personal Blog: If it’s one blog, use regular WordPress. Even if you have multiple categories, multiple authors, or a magazine-style blog with multiple topics, as long as it’s all under one site name your best bet is to stick with WordPress
- Managing Many Websites: Maybe but probably not. If we’re talking about just a few websites, each with completely different purposes, functions, and goals, it might be best to run them on separate installations of a single WordPress.
When should you use WordPress MultiSite?
- Perhaps the most popular use of WordPress Multisite is WordPress.com, which is a hosted blogging service where anyone can quickly and easily create their own personal blog. Every blog created on WordPress.com is another site added to the massive Multisite network.
What’s Different?
If you’ve worked with WordPress, but not WordPress Multisite, you’re probably wondering what is different between the two.
The “Super Administrator” Role: In regular WordPress, the “administrator” role has the highest permissions on the site. WordPress Multisite still has an administrator role for each site, but there is also the “super administrator.” The super administrator has access to every site on the network, with the ability to manage everything on every site.
Network Admin: In addition to the dashboard for each individual site on a WordPress Multisite network, there is another admin dashboard called the “network admin.” This is where one can manage settings on a network-wide basis. Only super administrators can access this area.
Plugins and Themes: Another important difference between WordPress and WordPress Multisite is how plugins and themes are managed. In WordPress Multisite, plugins and themes are installed in the network admin and are available for use across any site in the network. There are two ways to activate a plugin or theme: At the network admin level, you can “network activate” a plugin or “network enable” a theme. This will make the plugin active or make the theme available for use across every site in the network. The other way is to activate the plugin or theme at the single-site level for each individual site.
How to setup and install a WordPress Multisite
While WordPress Multisite is really just a “mode” that can be enabled or disabled in WordPress, it isn’t as simple as flipping a switch. Here is an overview of the steps you should take when setting up WordPress Multisite.
You should first read the documentation in the WordPress Codex on Creating a Network. This provides step-by-step instructions for setting up WordPress Multisite.
Before you begin, you’ll want to be sure your web server is capable of running WordPress Multisite. A shared hosting account isn’t recommended, as Multisite will require more server resources than a typical WordPress site. Some hosts don’t support WordPress Multisite, so it’s always a good idea to check with your host beforehand.
To begin setting up WordPress Multisite, the codex instructs users to drop a snippet of code in wp-config.php, which enables the “network setup” screen.
From this point on, it’s a matter of following the on-screen instructions shown in the Network Setup screen as well as continuing to follow along with the step-by-step guide in the Codex. During this process, you’ll make the decision as to use subdomains (subdomain.mywebsite.com) or sub-directories (mywebsite.com/subdirectory) for each site created on your network. This decision cannot be reversed later!
After following the instructions provided in the Codex, your WordPress Multisite network should be up and running and ready to add sites within minutes.
Plugins and Resources
WordPress Multisite can be a powerful platform to use right out of the box. But there are a few plugins and resources that can be very useful.
WordPress MU Domain Mapping: This plugin makes it easy to map unique domains to individual sites on your network.
WordPress Blog Replicator: This is useful if you’re creating a lot of sites on your network and want to quickly/easily replicate the entire configuration of one “template” site. It can replicate everything including your pages, posts, plugin settings, widgets, and more.
Gravity Forms + User Registration Add-on: Gravity Forms has an available add-on called “user registration”, which makes it easy to add a front-end form where visitors can register new sites on your network. This is useful if you want to open up your network to the public and allow anyone to create a site.
iThemes Security – iThemes Security gives you over 30+ ways to secure and protect your WordPress MultiSite. On average, 30,000 new websites are hacked each day. WordPress sites can be an easy target for attacks because of plugin vulnerabilities, weak passwords and obsolete software, make sure you protect your sites.
How do you plan to use WordPress Multisite? Share your ideas in the comments.

Tech Disillusionment
For four decades, I have worked in the tech industry. I started in the 1980s when computing...
A Poem: The Consultant's Message
On a Friday, cold and gray,
The message came, sharp as steel,
Not from those we...
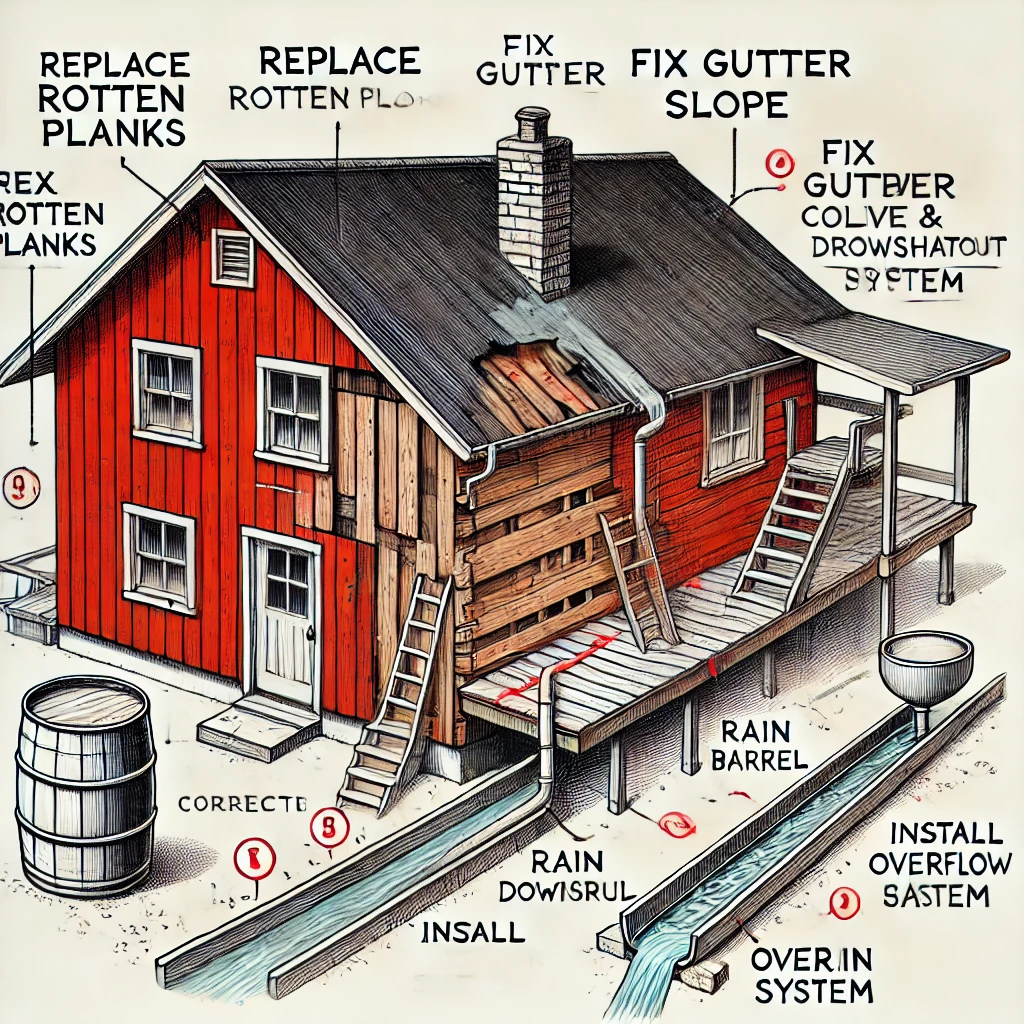
Using AI to Plan Wall Repair and Gutter Installation
In this article, I will share my experience using AI to plan the work required to fix a wall...